hrp's blog

“吹个牛逼而已,那么认真搞毛啊”

0%

2024年中国计量大学电子设计竞赛实录

“立创”杯2024年中国计量大学电子设计竞赛暨2024年浙江省大学生电子设计竞赛选拔赛

比赛安排:
1.5.06~5.10学生钉钉加群在线报名。
2.5.11~5.27学生比赛制作环节。

本次比赛,我们选择了B题,题目如下:

-qSiGRtKCUS6Mmc8D-002

我们使用两个步进电机搭建云台,并最终采用了OpenMV+长焦镜头来进行识别。本次比赛我主要负责第三、四问的视觉和声音部分。

视觉部分思路

寻找角点

题目要求使用激光在1.8cm宽的条带上巡线,与控制同学沟通后,我决定识别出图形的所有角点并返回给主控,由主控进行插补运算。那么第一个问题就变成了如何识别出图形的角点,对于使用OpenCV的组别来说,这似乎根本不成问题,因为OpenCV自带了识别角点的例程,稍作修改就能完美识别该图形。但是OpenMV并没有给出角点检测的函数,其图片格式也并不是由Numpy数组储存,不可能去简单套用OpenCV的识别思路。

经过仔细的查询文档和实验,我发现OpenMV虽然不能给出一组点集,但可以通过image.find_line_segments()方法来找出线段的始末点,经实践检验,通过长焦镜头放大图像后识别效果很好,基本上能准确的返回线段的始末点。

接下来开始计算线段交点,但视觉识别并不能严格保证线段交点完全重合,故增加了线段交点模糊匹配的判断。

代码如下:

1
2
3
4
5
6
7
8
9
10
11
12
13
14
15
16
17
18
19
20
21
22
23
24
25
26
27
28
29
30
31
32
33
34
35
36
37
38
39
40
41
def find_intersection_distance(lines,distance_threhold):
intersections = []
for i in range(len(lines)):
for j in range(i+1, len(lines)):
line1 = lines[i]
line2 = lines[j]
x1, y1, x2, y2 = line1[0], line1[1], line1[2], line1[3]
x3, y3, x4, y4 = line2[0], line2[1], line2[2], line2[3]
#distancep1 = ((x1 - x2) ** 2 + (y1 - y2) ** 2)
# distancep2 = ((x3 - x4) ** 2 + (y3 - y4) ** 2)
#if(distancep1>900 and distancep2>900):
if (x1 - x2) * (y3 - y4) == (y1 - y2) * (x3 - x4):
continue

px = ((x1 * y2 - y1 * x2) * (x3 - x4) - (x1 - x2) * (x3 * y4 - y3 * x4)) / ((x1 - x2) * (y3 - y4) - (y1 - y2) * (x3 - x4))
py = ((x1 * y2 - y1 * x2) * (y3 - y4) - (y1 - y2) * (x3 * y4 - y3 * x4)) / ((x1 - x2) * (y3 - y4) - (y1 - y2) * (x3 - x4))

# 计算两线段端点之间的距离
distance1 = ((x1 - x3) ** 2 + (y1 - y3) ** 2) ** 0.5
distance2 = ((x1 - x4) ** 2 + (y1 - y4) ** 2) ** 0.5
distance3 = ((x2 - x3) ** 2 + (y2 - y3) ** 2) ** 0.5
distance4 = ((x2 - x4) ** 2 + (y2 - y4) ** 2) ** 0.5

# 如果两线段端点之间的距离小于distance_threhold,则认为它们相交
if min(distance1, distance2, distance3, distance4) < distance_threhold:
px = round(px) # 将交点的横坐标四舍五入为整数
py = round(py) # 将交点的纵坐标四舍五入为整数
if(((b[2]+b[0]+10)>px>(b[0]-10)) and ((b[1]+b[3]+10)>py>(b[1]-10))):#b[]中均为图像外接矩形框的X,Y,W,H坐标
intersections.append((px, py))
for i in range(len(intersections)):
for j in range(i+1, len(intersections)):
if(i<len(intersections) and j<len(intersections)):
x1, y1 = intersections[i]
x2, y2 = intersections[j]

distance = ((x1 - x2) ** 2 + (y1 - y2) ** 2) ** 0.5
if distance < distance_threhold:
intersections.remove((x1, y1))
intersections.remove((x2, y2))

break

该部分代码大多为人工智能生成,经简单修改后通过了测试,能成功的在五角星上返回内外20个点。

接下来是滤波,由于现场的光照条件未知,纸板上很有可能会有大大小小的阴影,所以我决定先对图像二值化,找出图像所在的外接矩形坐标,之后再以此为ROI计算线段交点,尽可能减少环境光以及KT板位置对识别的干扰,大大增强了程序的鲁棒性,这个实现起来很简单,不做赘述。

排序

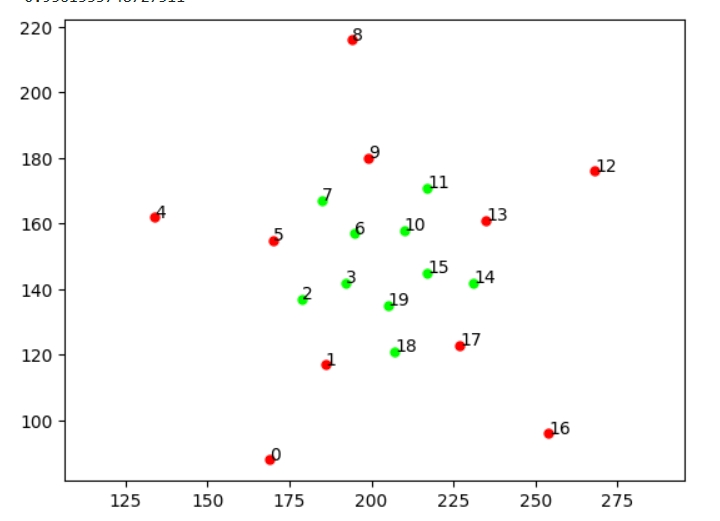
现在我们有了20个角点(题目要求三种图形,为行文方便,本文只介绍五角星的情况,其他图形思路一样),但我们最终的目标是巡线,需要有顺序的将这些点排列出来。我们选择顺时针将其排列,这里我们使用了Matplotlib进行模拟,大致的思路就是首先计算图像的中心坐标,然后根据点与图像中心点坐标的距离将点集分为内外两部分,最后将内外的点集分别沿顺时针排列。

这部分代码同样有ai的帮助,写的非常丑陋,故只给出在Matplotlib上的效果,代码如下:

1
2
3
4
5
6
7
8
9
10
11
12
13
14
15
16
17
18
19
20
21
22
23
24
25
26
27
28
29
30
31
32
33
34
35
36
37
38
39
40
41
42
43
44
45
46
47
48
49
50
51
52
53
54
55
56
57
58
59
60
61
62
63
64
65
66
67
68
69
70
71
72
73
74
75
76
77
78
79
80
81
82
83
84
85
86
87
88
89
90
91
92
import math
import random
%matplotlib inline
import matplotlib.pyplot as plt
from math import atan2
import math
# 生成10个随机点
#points = [(221, 209), (233, 220), (206, 218), (224, 235), (209, 233),(224, 195), (247, 217), (194, 211),(232, 247), (199, 243)]
#outpoints=[(244, 197), (203, 191), (251, 238), (182, 231), (212, 259), (187, 160), (283, 252), (272, 168), (145, 239), (206, 297)]
allpoints=[(227, 123), (205, 135), (185, 167), (134, 162), (194, 216), (217, 171), (217, 145), (195, 157), (170, 155), (199, 180), (210, 158), (192, 142), (179, 137), (235, 161), (186, 117), (254, 96), (207, 121), (231, 142), (169, 88), (268, 176)]
cx=204
cy=148

distances = []
# 计算每个点的极角
def polar_angle(point):
x, y = point
return math.atan2(x-cx, y-cy)

# 根据极角对点进行排序
FinalPoints=[]

i=0
def distance(point1, point2):
x1, y1 = point1
x2, y2 = point2
return math.sqrt((x1 - x2) ** 2 + (y1 - y2) ** 2)

def ClockWiseSorting(sorted_list,centralpoints):
for i in range(0,(len(sorted_list)-1),2):
print(i)
if(distance(centralpoints,sorted_list[i])<distance(centralpoints,sorted_list[i+1])):
temp=sorted_list[i]
sorted_list[i]=sorted_list[i+1]
sorted_list[i+1]=temp
temp=0
return sorted_list
#计算所有距离
for coordinate in allpoints:
distances.append((coordinate, distance(coordinate, (cx,cy))))
sorted_distances = sorted(distances, key=lambda x: x[1])
points_withdistance = sorted_distances[:10]
outpoints_withdistance = sorted_distances[10:]
points=[]
outpoints=[]
for pair, dist in points_withdistance:
print(f"{pair}: {dist}")
points.append(pair)
for pair, dist in outpoints_withdistance:
print(f"{pair}: {dist}")
outpoints.append(pair)


#sorted_points = sorted(points, key=polar_angle)
sorted_points = sorted(outpoints, key=polar_angle)
sorted_points=ClockWiseSorting(sorted_points,(cx,cy))
for point in sorted_points:
print(point)
FinalPoints
plt.annotate(i, (point[0],point[1]))
plt.plot(point[0],point[1],marker="o", markersize=5, markeredgecolor="red", markerfacecolor="red")
i+=1
if(i%2==0):
i+=2

sorted_points2 = sorted(points, key=polar_angle)
sorted_points2=ClockWiseSorting(sorted_points2,(220,220))
i=2
flag=18
for point in sorted_points2:
print("far")
print(point)
if(i==2):
if(polar_angle((point[0], point[1]))<polar_angle((sorted_points[0][0], sorted_points[0][1]))):
#point+=1
plt.annotate(flag, (point[0],point[1]))
plt.plot(point[0],point[1],marker="o", markersize=5, markeredgecolor="lime", markerfacecolor="lime")
flag+=1
continue

plt.annotate(i, (point[0],point[1]))
plt.plot(point[0],point[1],marker="o", markersize=5, markeredgecolor="lime", markerfacecolor="lime")
i+=1
if(i%2==0):
i+=2
print(polar_angle((194, 211)))
print(polar_angle((187, 160)))
plt.axis("equal")
plt.show()

效果如下:

微信截图_20240607142524

做到这里,视觉部分的主要要求也就基本实现了,剩下就是LCD和串口调试,这部分代码很简单且到处都能找到,故不赘述。

视觉部分总结

学长过去常常跟我说,做视觉最重要的是思路,有了思路都能慢慢实现出来,打完校赛后,深以为然。再大的问题,敢于想,敢于尝试,都有可能解决。

技术上,我感觉到我的代码能力还是需要加强,特别是对python数组的操作不够熟练,同样的功能不能复用,写的又臭又长,像是旧社会女人的裹脚布。同时异常处理也需要加强,早期版本的程序会在各种没有检测到对象的情况下直接卡飞,这样的问题到第二周才基本解决,倘若是在省赛或国赛中,恐怕已经无力回天了。

硬件上,160x120的LCD对于调试实在是有点不够用,该屏幕的可视角度极其糟糕,偏一点看过去就是一片白,这也导致在现场,镜头中出现了一小块反光,而我一直没能发现,差点葬送了全队两周的努力。

调试代码也太过于简单粗暴,接收到调节指令也没有反馈,收没收到全靠瞪眼,卡住全靠RESET,这样的问题在正式比赛中都有可能是致命的。

当然瑕不掩瑜,大一学生第一次参赛能拿到校特等奖对我们已经是非常大的胜利,不枉我们一年来的努力。

声音部分思路

声音部分本来应该是硬件同学负责的内容,但由于选购的传感器信号质量太差,实在不堪一用,所以我们在比赛结束前两天更换了方案,阴差阳错间,声源和检测装置都变成了我的工作。

我们首先制作了一个能发出特定频率的声源,使用PWM发生器生成1.5KHZ的正弦波并通过L298N放大电流,驱动一个10W的喇叭。L298N在这个任务中的表现出人意料的好,其功率大,发热小,相较于功放模块能经受的电流更大。最重要的是,我们对该模块十分熟悉,上手就能使用,减少了学习新模块的时间成本。

然后使用一个maix dock开发板,该k210开发板自带了一个全指向性数字麦克风,我们试图将其改造为指向性麦克风,然后让麦克风随云台旋转,过程中实时记录声音经过FFT变换后在1.5khz上的强度,最终通过寻找声强变化曲线和声源位置的关系来进行声源定位。Maixpy的FFT例程在MaixPy-v1_scripts/hardware/demo_fft_spectrum.py at master · sipeed/MaixPy-v1_scripts (github.com)

可惜的是,本方案实际上并不可行,因为指向性麦克风是无法被简单的改装出来的。我赛后咨询了一位在日本学习声学相关专业的同学,他告诉我,单指向性麦克风大多在振膜结构上就与普通麦克风不同,所以无法简单的被改装出来。可惜我们缺乏声学知识,知网上也没能找到关于单指向性麦克风设计的文章,误入了歧途。

幸运的是,这套系统在评测时成功定位了一次,成为了我们最终拿到校特的关键一招。GG WP

最后,希望今年省赛我们也能有如此好运,GL HF!